Guide
How to zoom in on a screen recording on a Mac
On a phone or in a small embed, a full-screen recording makes buttons and text too small to read. Zooming in on the part that matters fixes that. You can zoom while you record or add zooms afterwards, and the second is much easier to get right. Here's how both work on a Mac, and what each one costs you.
The short answer
- While recording: make the content bigger at the source (⌘+ in most apps, or a larger-text display setting), or use macOS Accessibility Zoom. Test Accessibility Zoom first, because not every recording picks it up.
- After recording, built in: iMovie zooms with its Ken Burns crop, one clip at a time. Fine for a zoom or two.
- After recording, automatic: Shotnix places a zoom for each burst of clicks as soon as a recording opens, and each zoom can follow your cursor or be aimed by hand.
Zoom while recording, or after?
Zooming live means doing two jobs at once: the demo and the camera work. Each zoom is permanent the moment it happens, and a mistimed one means another take. Zooming afterwards lets you put each zoom exactly where it helps, then change it or undo it. For anything you'll publish, record the full view and zoom in the edit.
Method 1: Make the content bigger before you record
- Zoom the app: press ⌘+ (View → Zoom In in browsers and many apps) until text is easy to read on a small screen.
- Scale the display: in System Settings → Displays, choose a resolution toward Larger Text. Everything gets bigger, including the menu bar.
- Record less: capture just the window or area you're demoing instead of the whole display, so it fills more of the frame. Very small areas look soft when exported at a large size.
Note. None of this moves during the video, but it solves the same problem, and every recorder captures it.
Method 2: macOS Accessibility Zoom while recording
- Open System Settings → Accessibility → Zoom and turn on Use keyboard shortcuts to zoom. Use scroll gesture with modifier keys to zoom (Control by default) is handy too.
- Leave Zoom style set to Full Screen.
- Start the recording, for example with ⌘⇧5 → Record Entire Screen.
- Press ⌥⌘+ to zoom in and ⌥⌘− to zoom out, or hold Control and scroll. ⌥⌘8 turns Zoom on and off.
- Stop the recording and watch it back before you rely on it.
Note. Depending on your macOS version and recorder, the file may show the normal, unzoomed screen even though you saw the magnified view, so test with a short clip first. When it does record, every move is permanent, tied to your hand, and the zoomed view moves with the pointer.
Method 3: Zoom after recording in iMovie
- Add the recording to an iMovie project and select it in the timeline.
- Move the playhead to where the zoom should start and press ⌘B (Modify → Split Clip). Split again where it should end. The Ken Burns effect always spans a whole clip, so each zoom needs its own clip.
- Select the clip, click the Cropping button above the viewer, then click Ken Burns.
- Set the Start frame to the full picture and the End frame around the detail, then click Apply.
- To hold and zoom back out, split the next section too: use Crop to Fill with the same framing to hold, then Ken Burns with the Start and End frames swapped.
Note. iMovie can't follow the cursor, and matching the framing across clips by eye is fiddly, so expect a few minutes per zoom. Final Cut Pro does the same with keyframes, with more control and more work.
Method 4: Automatic zooms in Shotnix
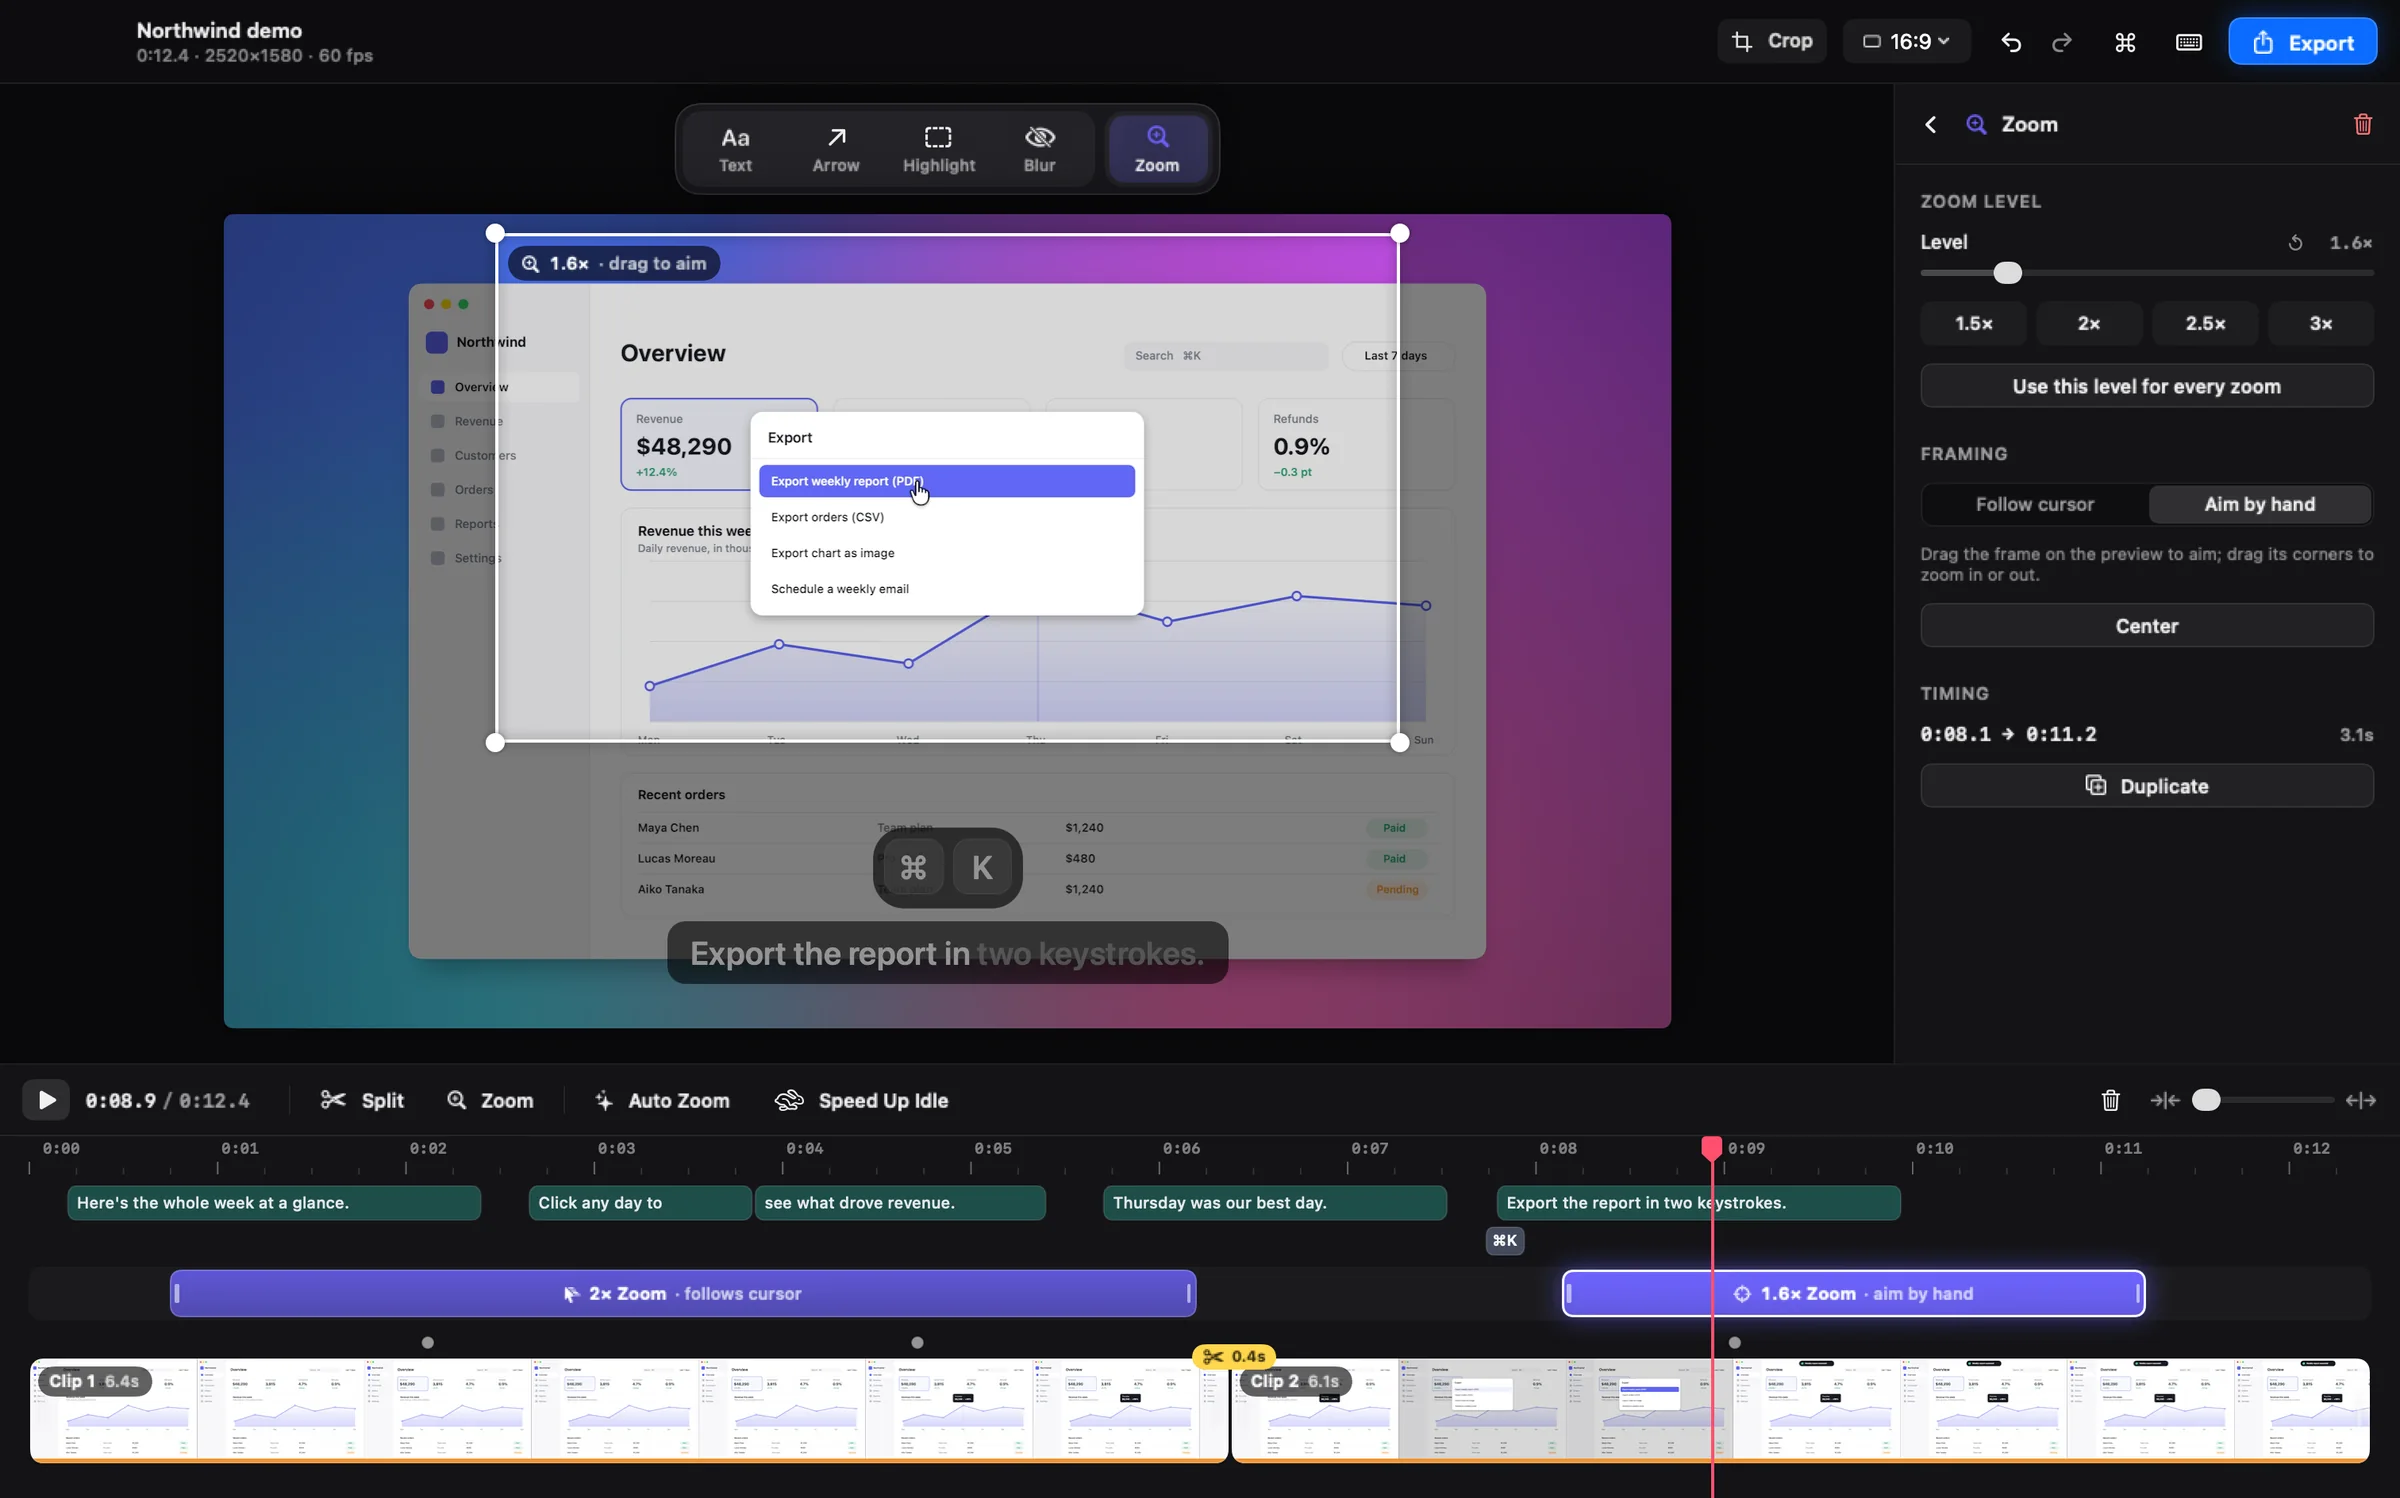
Shotnix records your pointer and clicks as data next to the video. When a fresh recording opens in the editor, Auto Zoom has already placed a zoom for each burst of clicks, timed so the camera arrives just before the click. Zooms close together chain into one smooth pan instead of pulling out and pushing back in.
- Record with Shotnix. Keep Editable cursor on (the default, in Settings → Recording) so the pointer is redrawn in the editor.
- Click Edit Video. The zooms sit as blocks on the Zoom track.
- Play it through. Drag a block to move it, drag an edge to change its length, and pick a level: presets from 1.5× to 3×, up to 4×, or keys 1 to 5.
- Add a zoom anywhere by clicking the Zoom track or pressing Z at the playhead.
- Select a zoom to choose its framing. Follow cursor keeps the pointer in view and glides after it. Aim by hand lets you drag the target frame on the preview.
- In the Zoom tab, set Motion to Slow, Smooth, Quick, or Instant, add motion blur if you like, and export.
Follow the cursor or aim by hand?
- Follow cursor suits work that moves around: filling a form, dragging between panels, walking through menus. The view glides after the pointer instead of snapping to it.
- Aim by hand suits a fixed target: a chart, a settings value, a line of code, or a result you want to hold on while you talk.
- Mix them freely. Re-run Auto Zoom whenever you like; zooms you placed by hand are kept.
Tips for zooms that help
- One idea per zoom. Push in for the click that matters, hold while it lands, and pull back out.
- Keep levels modest. 1.5× to 2× reads well for most interfaces; save 3× and more for small details.
- Record at full resolution. A zoom enlarges the pixels you captured. On a Retina display the recording has twice the width and height in pixels of what you see, which is why a 2× zoom usually still looks sharp in a 1080p export.
- Keep the pointer clean. Shotnix redraws the pointer from data, so it stays crisp inside a zoom, and cursor smoothing removes the jitter a zoom would magnify.
- Move the camera out of the way. With Shrink while zoomed on, your camera bubble gets smaller during zoom moves.
- Blur follows zooms. A blur annotation stays on the private detail while the view moves.
Questions
How do you zoom in while screen recording on a Mac?
Turn on Use keyboard shortcuts to zoom in System Settings → Accessibility → Zoom, then press ⌥⌘+ and ⌥⌘− while recording. Test a short clip first, since not every recording captures the magnified view. Adding zooms after recording is more reliable and easier to fix.
Can iMovie zoom in on part of a video?
Yes. Select the clip, click the Cropping button, and use Crop to Fill for a still zoom or Ken Burns for a moving one. The effect spans the whole clip, so split the clip with ⌘B to zoom on a single moment.
Does QuickTime Player have a zoom tool?
No. QuickTime Player can trim, split, rotate, and flip a video, but it can't zoom into part of the frame.
What is auto zoom in a screen recording?
Zooms placed for you based on what happened in the recording. In Shotnix, Auto Zoom reads the clicks it recorded and adds a zoom for each burst, arriving just before the click. Re-run it any time; zooms you placed by hand stay.
Why does my zoomed-in screen recording look blurry?
A zoom enlarges the pixels you recorded. Record at your display's full resolution, keep zooms near 2× for small text, and don't export at a higher resolution than the recording. Shotnix warns you before an export like that.
Can I add zooms to a video I didn't record with Shotnix?
Yes. Open it in the Shotnix editor and aim zooms by hand. Auto Zoom and Follow cursor rely on the click and pointer data Shotnix records, so those work on Shotnix recordings.
Try it on your own screen.
Shotnix is free, open source, and local, with no watermark. Download the notarized app, or star the repository to follow along.
11.7 MB · Apple silicon (M1 or later) · macOS 13+ · notarized by Apple · MIT license